

Complete Front Yard Landscape Design: 3-Tier Left and Right side Plant Installation, Fieldstone Wall, with an Organic Mulch Finish
A great front yard landscape design should do more than make a property look cleaned up. It should frame the home, create depth, improve curb appeal, and give every plant a clear purpose in the overall layout.
For this New Providence, NJ landscape design project, the existing front yard had become heavily overgrown. Large shrubs, trees, ivy, and old vegetation had consumed the front and left side of the home, extended into the lawn, and covered important parts of the house. What should have been a welcoming front landscape had become crowded, dark, and difficult to maintain.
The PHR Crew completed a full front yard renovation that included the full removal and excavation of the existing landscape, cleanup around the foundation, new plant and ornamental tree installation, a rebuilt natural fieldstone wall, and a finished layer of organic hardwood mulch.
This updated design used a three-tier landscape system, creating a front yard that feels open, colorful, structured, and natural to the home.
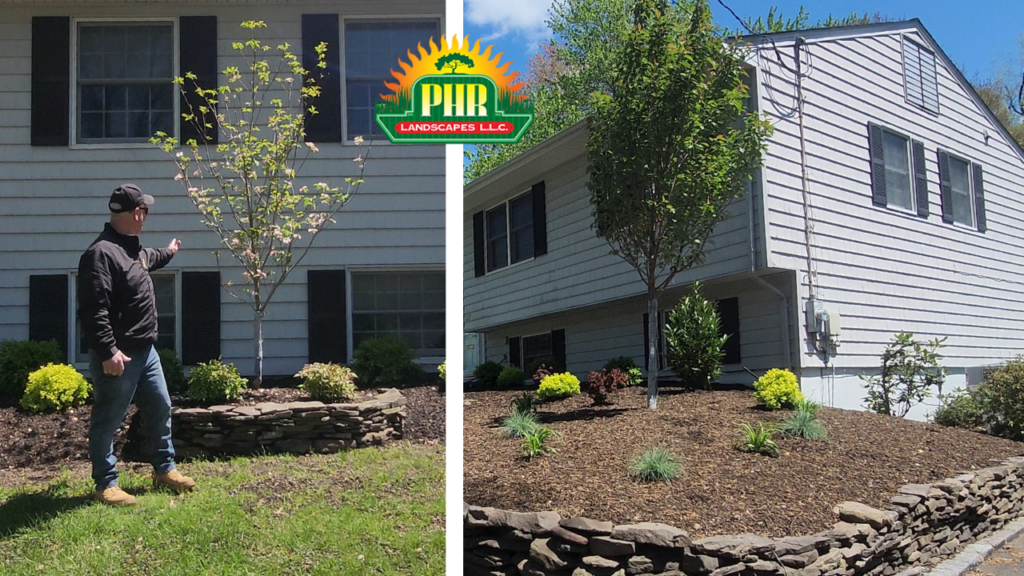
Project Overview: Front Yard Landscape Renovation
This New Providence landscape project started with a front yard that had become heavily overgrown. Mature shrubs, trees, ivy, and old vegetation had taken over the front and left side of the home, covering the foundation, growing into the clapboards, shutters, and window frames, and extending out into the lawn.
PHR Landscapes completed a full front yard reset, including:
- Complete removal of front bushes, trees, ivy, and overgrown vegetation
- Excavation of deep-rooted shrubs using a backhoe
- Careful breakdown and saving of the existing fieldstone wall
- Raking and preparation of the beds down to the sub-topsoil
- On-site plant placement adjustments with the homeowner
- Installation of a three-tier landscape design
- Rebuilding the fieldstone wall using saved stone from the original landscape
- Final finish with a light, even spread of organic hardwood mulch
The new design was built around a layered three-tier system. Foundation evergreens like skip laurels and boxwoods created year-round structure in the back tier. Ornamental trees and colorful shrubs, including dogwood, cherry tree, golden spirea, barberries, and astilbe, added focal points and seasonal interest in the middle tier. Lower perennials and ground cover plantings completed the front tier, softening the edge of the beds and tying the design together.
Quick Note: Why Do We Tier Landscape Designs?
Tiering is one of the most important principles in professional landscape design.
Instead of placing one flat row of shrubs across the front of a house, a tiered landscape uses layers of different heights, textures, colors, and seasonal interest. This creates depth and movement, helping the eye travel naturally through the landscape.
The back tier gives the home structure.
The middle tier adds color, shape, and focal points.
The front tier softens the edge and finishes the bed.
This matters because a front yard is viewed from multiple angles: the street, the driveway, the walkway, the front door, and even from inside the home. A flat planting design may look fine from one direction, but a tiered design feels fuller and more intentional from every angle.
For this New Providence property, the goal was to create a landscape that looked finished immediately, but also had room to mature naturally over time. The design needed to feel full without becoming overcrowded, colorful without feeling chaotic, and structured without looking too formal.
That is where the three-tier system works especially well.
Before: An Overgrown Landscape Hiding the Home
Before the new landscape could be installed, the property needed a complete reset.
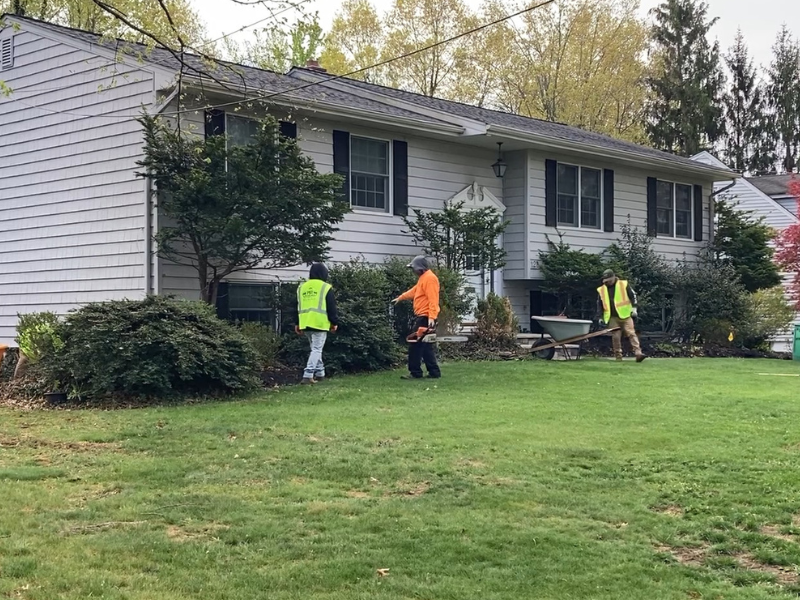
The front bushes, trees, vegetation, and ivy had grown well beyond the original bed lines. The overgrowth had taken over the front and left side of the house and pushed outward into the lawn and property edges.
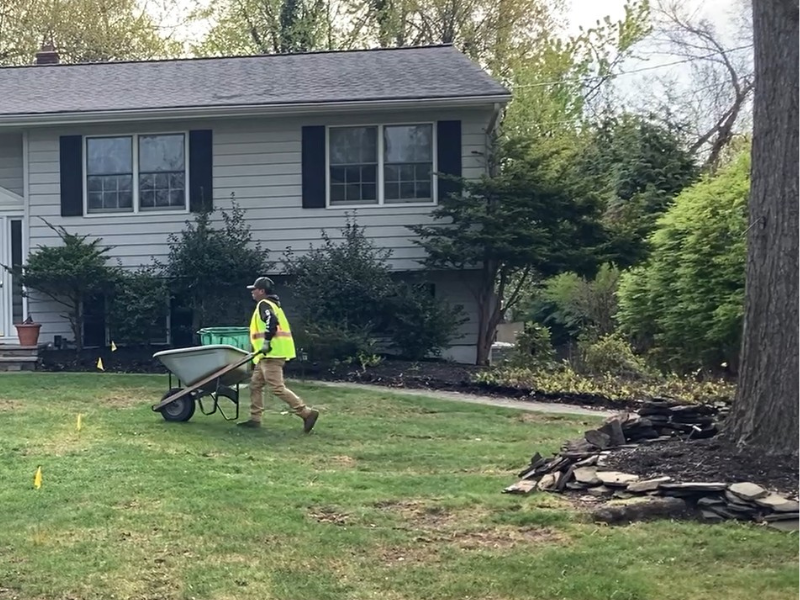
One of the biggest concerns was the ivy. Ivy had grown aggressively into the foundation area, bottom-level clapboards, shutters, and window frames. While ivy can look attractive when controlled, it can become a serious maintenance issue once it starts working into siding, trim, windows, and foundation gaps.
For this project, trimming the existing shrubs would not have solved the problem. The old landscape needed to be fully removed so the home could be opened back up and the new design could be built properly from the ground up.
Step-by-Step: Full Frontal Landscape Design Process
Step 1: Complete Landscape Removal and Excavation
The first phase of this project was full removal of the existing front landscape.
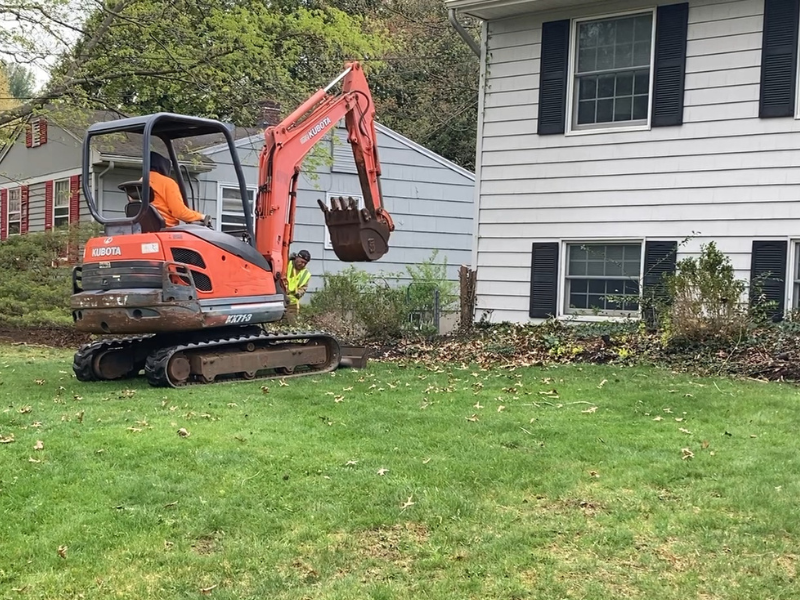
The PHR crew removed the front bushes, trees, ivy, and overgrown vegetation that had consumed the foundation beds and extended into the lawn. Because the older shrubs were long-standing and deeply rooted, a backhoe excavator was brought in to help with the removal.
This was an important step. When large shrubs have been established for years, the roots can be dense, deep, and difficult to remove by hand. If those root systems are left behind, they can interfere with new plantings, create uneven soil conditions, and allow unwanted regrowth.
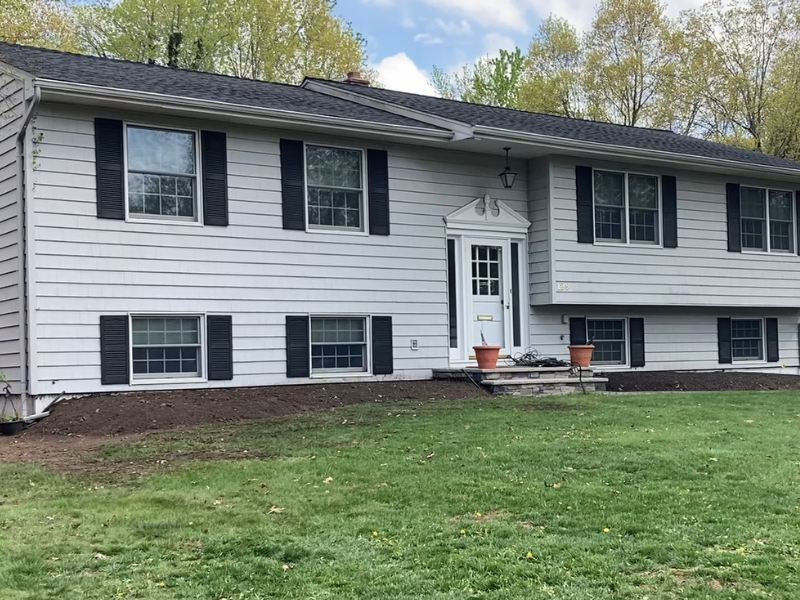
The existing fieldstone walls were also carefully broken down during this phase. Instead of discarding the stone, usable pieces were saved so they could be rebuilt into the finished landscape.
Step 2: Raking Out and Preparing Beds for Plant Installation
Once the existing landscape was fully removed, the beds were raked out and prepared down to the sub-topsoil. This step allowed the crew to clean out old debris, expose the true grade of the beds, and prepare a healthier planting area for the new trees, shrubs, and perennials.
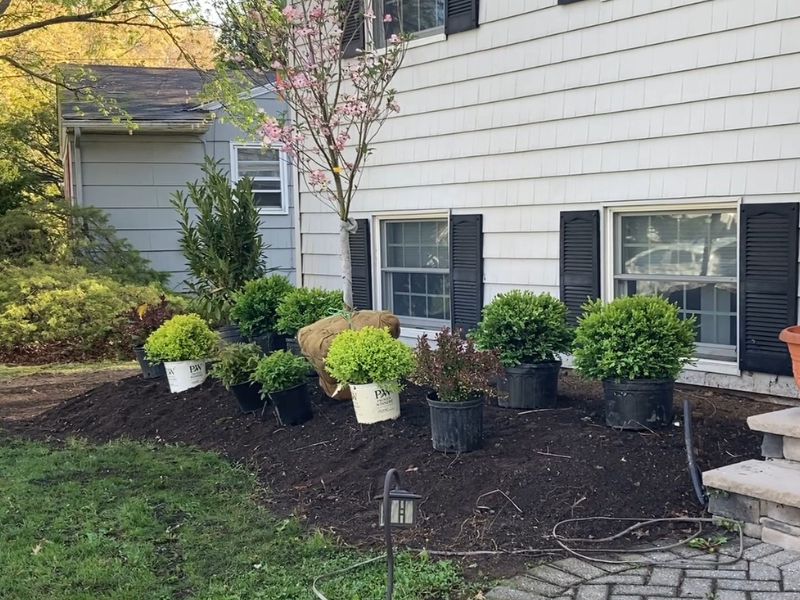
Proper bed preparation is one of the most important parts of landscape installation. It affects how the plants sit, how water moves through the area, how the mulch finishes, and how clean the final bed lines appear.
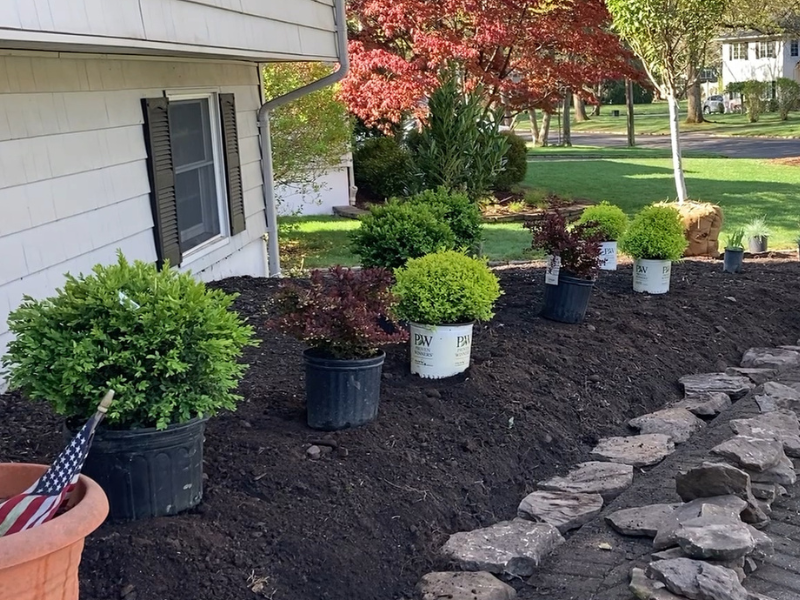
After the beds were prepared, plant placements were laid out according to the design plan and reviewed with the homeowner. Small adjustments were made on-site to improve spacing, visibility, plant health, and overall aesthetics.
That on-site adjustment process is an important part of professional landscaping. Even with a strong design plan, the final layout has to respond to the actual property, including slope, sunlight, window placement, walkway views, and mature plant size.
Rebuilding the Natural Fieldstone Wall
After the planting layout was installed, the PHR crew began rebuilding the fieldstone wall using stone saved from the original landscape. This was one of the most meaningful parts of the project.
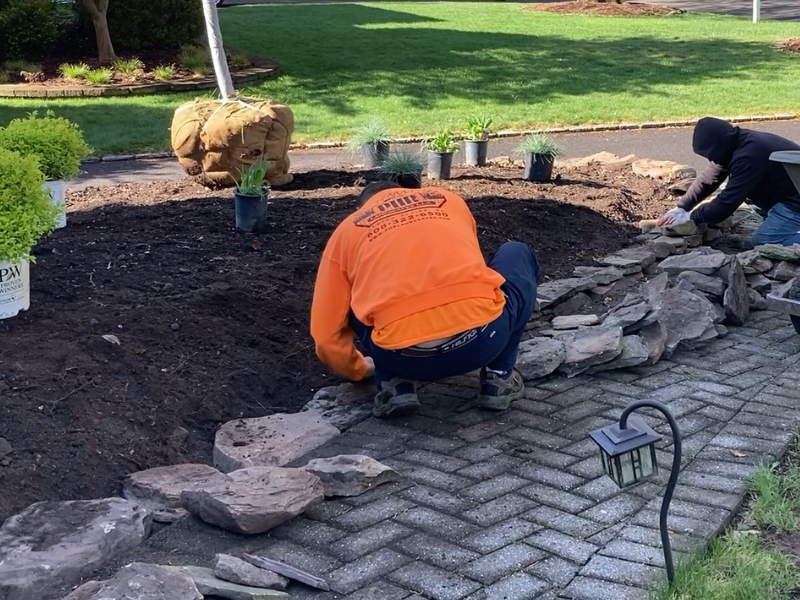
The original wall had to be broken down during the removal phase, but many of the stones were still usable. By saving and rebuilding with those stones, the finished landscape kept a natural connection to the home’s previous design.
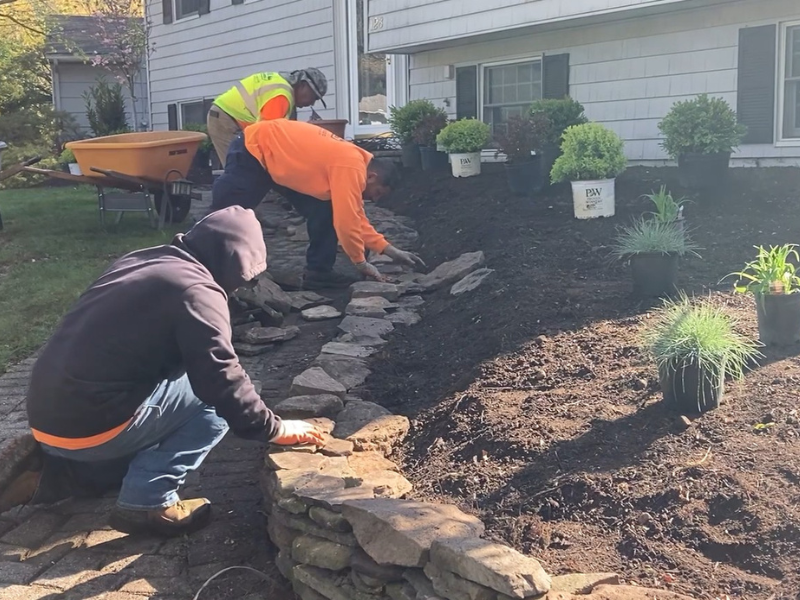
The fieldstone wall was rebuilt layer by layer, generally four to five stones tall depending on the section. This gave the front beds a clean edge, helped define the slope, and added natural hardscape structure to the property.
A backfill of base stone was added behind the wall for durability and long-term support. This helps improve drainage, support the wall, and reduce shifting over time.
Natural fieldstone works especially well in New Jersey landscaping because it feels timeless. It pairs beautifully with mature homes, wooded lots, sloped front yards, and layered planting beds. It also gives the landscape a handcrafted feel that standard edging often cannot match.
Watch the FULL TRANSFORMATION Video on Youtube! (link)
Step 3: Installing a 3-Tier Landscape System
The new design was built around a three-tier planting system.
Each tier had a different job, but all three worked together to create one balanced front yard landscape.
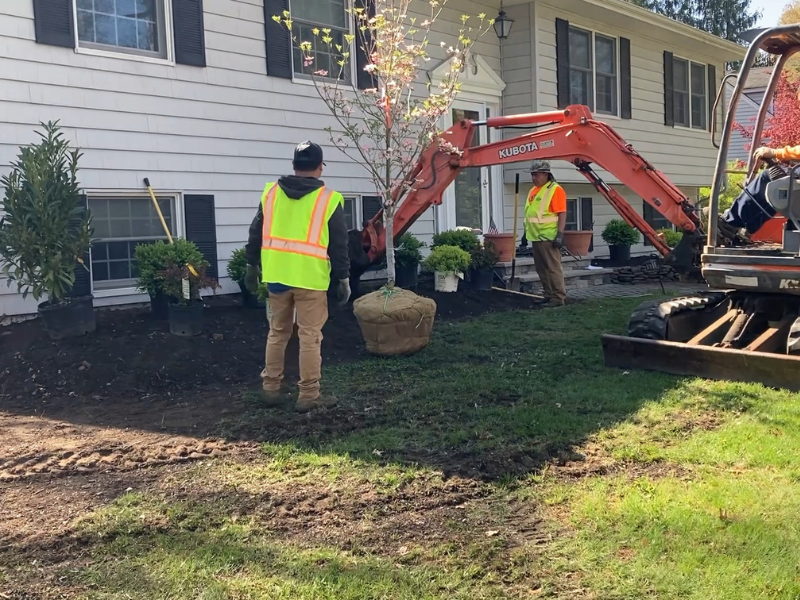
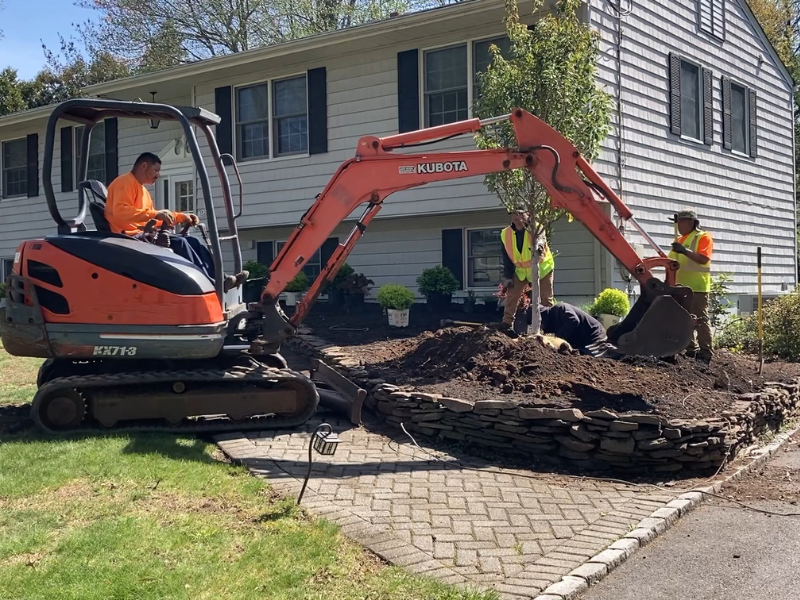
Tier 1: Foundation Evergreens for Year-Round Structure
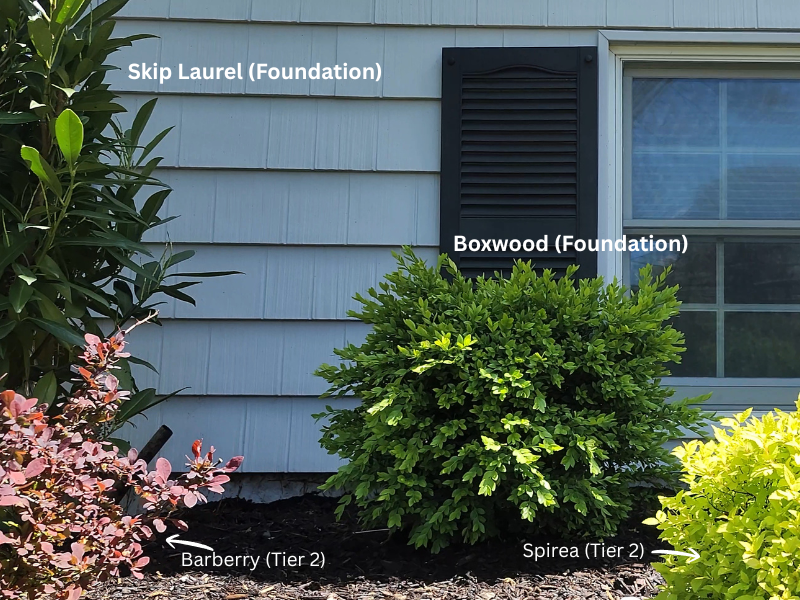
The first tier included foundation evergreens such as skip laurels and boxwoods.
This back layer helps anchor the house visually. Foundation evergreens are especially valuable in New Jersey landscapes because they provide structure even during winter, when many flowering shrubs and perennials are dormant.
Skip laurels were used to create upright evergreen mass without making the front of the home feel boxed in. They help soften the foundation and create a clean green backdrop behind the more colorful plantings.
Boxwoods were used for shape, structure, and classic front yard appeal. Their compact form works well near foundation areas, windows, and bed corners where a cleaner, more controlled plant shape is needed.
Together, these evergreens give the landscape a dependable backbone. Even as the flowering plants change through the seasons, the foundation layer keeps the design organized.
Tier 2: Ornamental Trees, Colorful Shrubs, and Contrast
The second tier is where the landscape starts to gain personality.
This layer included ornamental trees, colorful shrubs, and deer-resistant plantings that brought contrast and seasonal interest to the front yard.
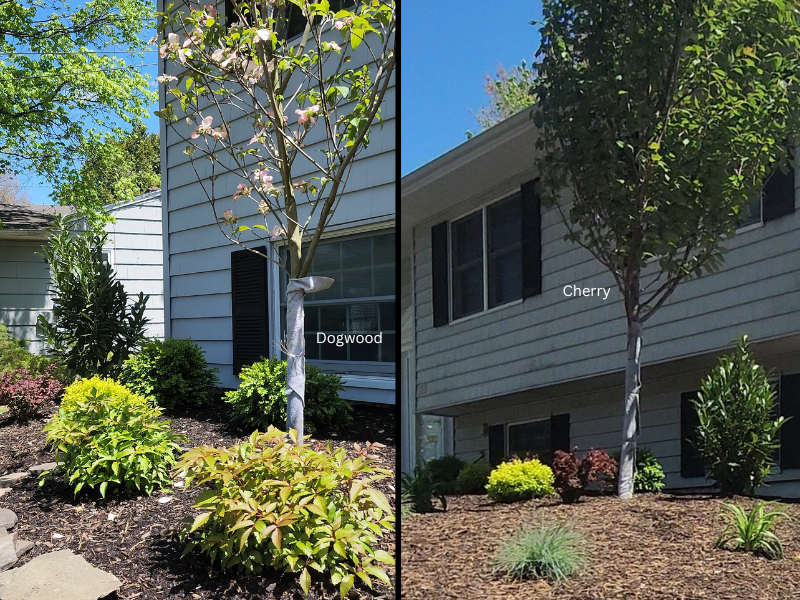
On the left side of the home, a dogwood tree was used as a centerpiece. Dogwoods are excellent ornamental trees for front yard landscaping because they offer spring flowers, attractive branching, and a softer natural shape that does not overpower the home.
The dogwood was flanked with golden spirea, barberries, astilbe, and supporting shrubs to create a colorful and textured middle layer.
Golden spirea brings bright yellow-green foliage that stands out against the darker mulch and evergreen backdrop. Barberries add deeper red and burgundy tones, creating strong color contrast. Astilbe adds a softer flowering texture, which helps break up the heavier shrub forms and gives the planting bed a more natural feel.
This is the difference between simply installing plants and designing with plants. The goal is not just to fill space. The goal is to create contrast between leaf color, plant shape, height, bloom time, and texture.
The right side of the home followed a similar design language but shifted the focus toward a larger cherry tree. This helped balance the dogwood on the left while avoiding an overly mirrored design.
A strong landscape does not always need to be perfectly symmetrical. In many front yards, a balanced but slightly asymmetrical design feels more natural. The dogwood and cherry tree created two separate focal points while still tying the entire front landscape together.
Tier 3: Perennials and Ground Cover to Soften the Front Edge
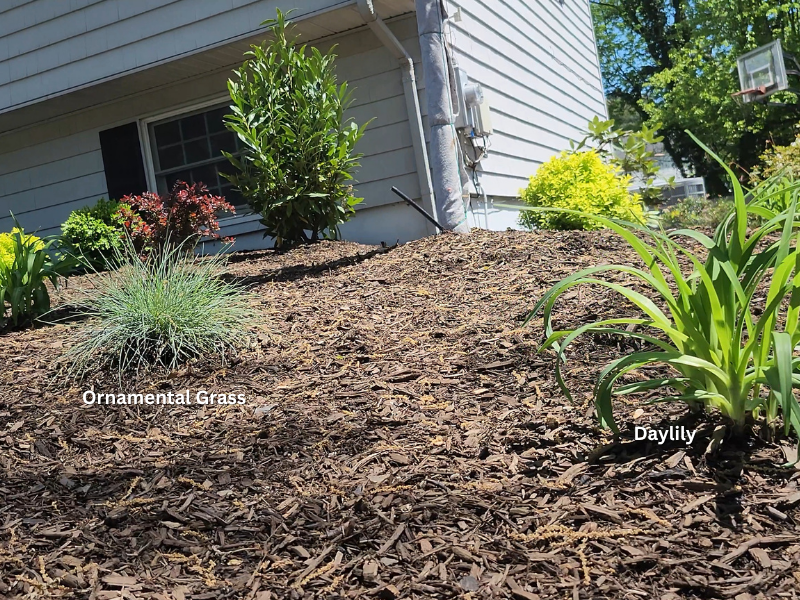
The third tier finished the design with lower-growing perennials and ground cover plantings.
This front layer is what makes a planting bed feel polished. Without it, larger shrubs and trees can feel heavy or abrupt. Lower plantings soften the transition between the stone wall, mulch, and taller plants behind them.
For this New Providence landscape, the third tier helped connect the rebuilt fieldstone wall to the planting beds above it. The lower plantings added detail up close, especially from the driveway and walkway areas.
This tier also helps the design feel more complete from the street. Instead of seeing only mulch and large shrubs, the eye moves from the stone wall into the smaller perennials, then up through the colorful shrubs, ornamental trees, and foundation evergreens.
That layered movement is what gives the finished landscape depth.
Left Side Plant Design: Dogwood, Skip Laurels, Boxwoods, Spirea, Barberry, and Astilbe
The left side of the home became one of the main focal areas of the project.
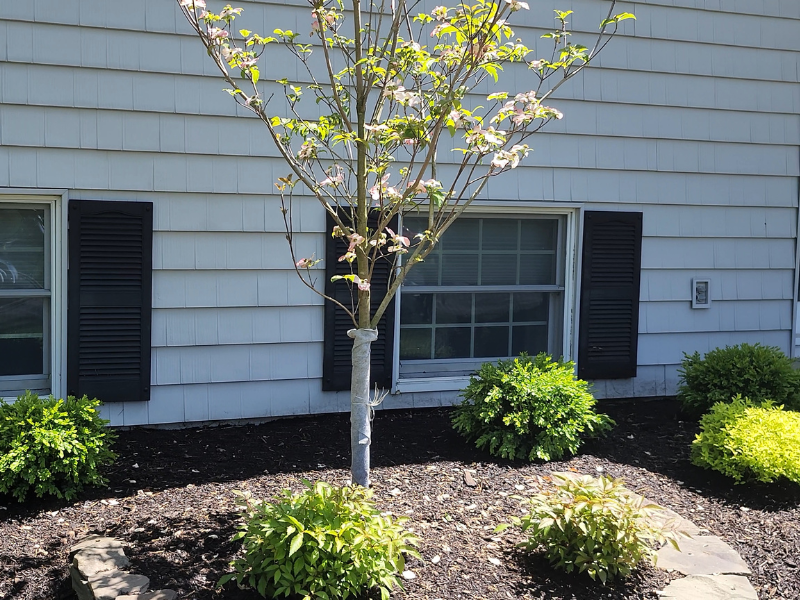
This section featured foundation skip laurels and boxwoods in the back tier, creating evergreen structure behind the colorful plantings. A dogwood tree served as the centerpiece, giving the bed height, seasonal flowers, and a graceful ornamental shape.
Around the dogwood, golden spirea, barberries, astilbe, and perennial ground cover helped create a custom color combination. The bright spirea foliage added energy and contrast, the barberries brought deeper tones, and the astilbe introduced softer flowering texture.
The result was a layered planting bed that feels colorful without becoming overwhelming. Each plant has its own role, but the full combination works together as one design.
This is especially important in front yard landscaping. The best designs do not rely on one “showpiece” plant. They use a combination of structure, color, texture, and spacing so the landscape stays attractive throughout the season.
Right Side Plant Design: Cherry Tree Focal Point and Balanced Color
The right side of the home followed the same overall design style, but with a different focal point.
Instead of duplicating the left side exactly, the design shifted attention toward a large cherry tree. This created contrast against the dogwood while keeping the property balanced.
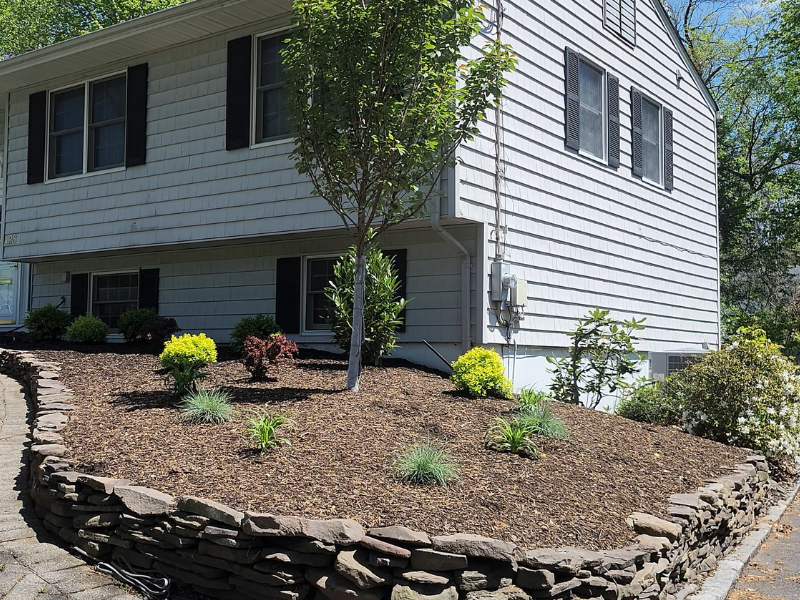
Using different ornamental trees on opposite sides of the front landscape helps the design feel more natural. The dogwood and cherry tree each bring seasonal interest, but their forms and bloom qualities create variety.
The supporting shrubs and perennials followed the same soil and plant material consistency as the left side, helping the full front yard feel connected. Repeating materials across the property is important because it prevents the design from feeling scattered.
The finished result is balanced, but not stiff. Structured, but not overly formal.
Organic Hardwood Mulch: Adding Contrast & Supporting Growth
Once the plantings and wall were complete, the entire design was finished with organic hardwood mulch.
Mulch gives the landscape a clean, finished appearance, but it also provides real plant health benefits. It helps retain soil moisture, regulate soil temperature, reduce weed pressure, and protect the root systems of new plantings.
For this project, the mulch also helped the plant colors stand out. The golden spirea, dark barberry foliage, green evergreens, ornamental trees, and natural stone all became more defined against the dark mulch finish.
A light, even spread was used throughout the beds. Proper mulch depth is important because too much mulch around plant bases and tree trunks can create moisture problems over time.
The final mulch layer tied the entire design together and gave the property a clean, professional finish.
The Finished Result: A Brighter, More Balanced Front Yard
The completed landscape completely changed the way this New Providence home presents from the street.
The home is now visible again. The front beds feel intentional and balanced. The fieldstone wall creates structure. The dogwood and cherry tree provide focal points. The evergreens give year-round shape. The shrubs and perennials add color, texture, and seasonal interest.
Most importantly, the new design has room to mature.
A good landscape installation should look finished when the project is complete, but it should also be designed for future growth. Plants need space to settle in, expand naturally, and become part of the property over time.
This project is a great example of how complete landscape removal, thoughtful plant selection, tiered design, hardscape structure, and mulch installation can transform an older front yard into a clean, colorful, and functional outdoor space.
Note: Deer-Resistant Planting in New Jersey
Deer pressure is a real concern for many homeowners in New Providence, Scotch Plains, Fanwood, Westfield, and surrounding New Jersey towns.
While no plant is completely deer-proof, choosing more deer-resistant plantings can help reduce damage and make a landscape easier to maintain. For this project, the plant selection was designed with color, texture, structure, and deer resistance in mind.
The goal was to create a landscape that looked beautiful, but also made sense for the area. A front yard planting design should not only look good on installation day. It should have a realistic chance of staying healthy and attractive as the seasons change.
That means choosing plants based on more than appearance alone. Sunlight, soil conditions, deer activity, mature size, and maintenance needs all matter.
A Front Yard Rebuilt with Structure, Color, and Character
This New Providence landscape renovation shows how much impact a thoughtful front yard design can have on a home’s curb appeal. What started as an overgrown landscape full of mature shrubs, ivy, deep roots, and aging stonework became a clean, layered, and inviting front yard with long-term structure.
By fully removing the existing overgrowth, preparing the beds properly, installing a three-tier planting design, and rebuilding the fieldstone wall with saved stone from the original landscape, PHR Landscapes was able to give the property a fresh new look while still preserving part of its natural character.
The finished design brings together foundation evergreens, ornamental trees, colorful shrubs, perennial ground cover, natural fieldstone, and hardwood mulch to create a front landscape that feels balanced, intentional, and built to mature beautifully over time.
Browse the project gallery below to see the full before-and-after transformation.
A Note from PHR Landscapes
This was an especially rewarding project for the PHR crew. We were able to take a front yard that had been completely overtaken by older growth, clear it properly, save the original fieldstone, and rebuild the space into something fresh, structured, and personal to the home. Being able to reuse stone from the prior landscape made the transformation even more meaningful. It gave the homeowner a brand-new design while still preserving part of the property’s original character.
Complete Landscape Design Services in Westfield, Fanwood, Scotch Plains NJ
PHR Landscapes provides professional landscaping, lawn renovation, grading, walkway installation, plant installation, hardscaping, and outdoor property improvement services throughout Westfield, Scotch Plains, Fanwood, and surrounding New Jersey communities.
Whether your front yard needs a fresh lawn, better drainage, a new walkway, a family play area, or a full landscape redesign, our team can help create a plan that fits your property and your goals.
From the first walkthrough to the final installation, we focus on building outdoor spaces that are practical, attractive, and made to be enjoyed.
For homeowners looking for a trusted landscaping company in Westfield, Scotch Plains, or Fanwood, NJ, PHR Landscapes is here to help bring your front yard back to life.
PHR’s Project Tips
Here are 5 professional tips that can make or break your garden design project:
1. Remove the Old Landscape Properly Before Replanting
If shrubs, ivy, or old trees are deeply rooted, cutting them down at the surface is not enough. Roots, vines, and buried debris can interfere with new plantings and create regrowth problems later. Start with a clean bed whenever possible.
2. Design in Layers, Not Rows
A strong front yard landscape should have depth. Use taller evergreens or ornamental trees in the back, colorful shrubs in the middle, and lower perennials or ground cover toward the front. This creates a more natural, professional look than one flat row of plants.
3. Think About Mature Plant Size
Plants may look small on installation day, but they need room to grow. Avoid packing shrubs too tightly just to make the bed look full immediately. Good spacing helps prevent crowding, disease, awkward pruning, and future removals.
4. Reuse Natural Materials When You Can
If your property already has fieldstone, boulders, or other natural hardscape materials, consider saving and reusing them. Rebuilt stone walls or borders can preserve character while still giving the landscape a fresh, updated structure.
5. Mulch Lightly and Evenly
Mulch should finish the bed, not bury the plants. A clean, even layer helps retain moisture, reduce weeds, and make plant colors stand out. Keep mulch away from tree trunks and plant crowns to avoid moisture buildup and long-term plant health issues.
Looking to refresh your yard with new plant design? Contact PHR Landscapes – your go-to landscaping company in Scotch Plains, Fanwood, and Westfield – to bring your vision to life.
👉 Contact us today to schedule your consultation and start building your dream backyard patio!
Follow us on Facebook @PHRLandscapes

Share This Post with Friends & Colleagues
